Barbagia, Sardegna
Seadas
Sardinian fried cheese pastries with honey
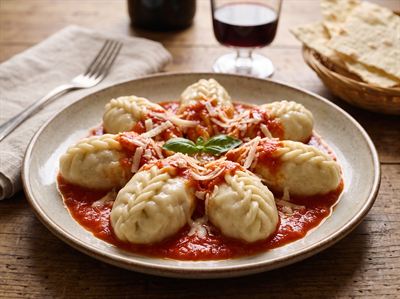
Sardinia's fried pastries of semolina and lard sealed round melted fresh pecorino and lemon zest, eaten hot under honey, and a PGI since 2023.
- Course
- DolciDesserts
- Serves
- 8
- Hands-on
- 1 h 27 min
- Cooking
- 8 min
- Resting
- 40 min+
In breve
In short
Also called Sebadas, Sabadas, Seattas, Savadas, Sevadas di Sardegna, Sebadas di Sardegna, Seadas di Sardegna, seada, sebada and Sardinian cheese fritters.
- A dough of durum wheat semolina (or soft wheat flour), water, salt and lard, the lard at most a fifth of its weight.
- No whole egg, butter or oil in the dough: besides the lard, the specification allows only an egg yolk.
- A filling of fresh sheep's, goat's or cow's milk cheese with grated lemon or orange zest, melted slowly until thick or mixed raw.
- Two thin sheets round the cheese, each 0.5 mm–3 mm thick, sealed all the way round: 4 cm–18 cm across and 30 g–300 g each.
- Fried, then covered with honey or sugar and eaten hot.
La provenienza
Where this recipe comes from
Seadas are the signature sweet of Sardinia: thin semolina pastry made with lard, sealed round a fresh, slightly sour cheese, fried and eaten hot under honey. They are fresh pasta in every respect, yet they are fried rather than boiled and eaten as a dessert. Their name changes from one part of the island to the next (seada, sebada, sabada, sevada, seatta), and all its forms seem to come from the Sardinian ‘seu’, fat, for the lard in the dough. The EU specification holds them to come from central Sardinia; they are typical of the Barbagia and northern Ogliastra, and are now made all over the island, above all in its pastoral areas. As the story goes, they were served to the shepherds on their return from transhumance, as a welcome home and a thanks for their work.
Since 2023 the name has been a PGI, registered by Regulation (EU) 2023/1426 in all six of its forms (Sebadas, Seadas, Sabadas, Seattas, Savadas, Sevadas), each followed by ‘di Sardegna’: only seadas made in Sardinia, the whole island and its archipelagos, under the specification may carry it. The specification fixes the dough (durum wheat semolina or soft wheat flour, water, salt and lard, at most 20% of the dough's weight, with an egg yolk if wished), the filling (sheep's, goat's or cow's milk cheese, or cow's curd, with grated lemon or orange zest and sugar if wished, mixed raw or melted over a low heat) and the sizes: each sheet 0.5–3 mm thick, each seada 4–18 cm across and 30–300 g, with pastry and filling each 40–60% of the weight. Melting the filling, as this page does, is what it calls the ancient recipe. It describes the raw seada, sold fresh or frozen; frying, and honey or sugar on top, are the custom it records. The quantities here are a published home batch within these limits, rolled to about 2 mm: within the 3 mm allowed, and thin enough for the batch's 32 discs. The cheese is melted together with the zest, as the specification describes.
- Provenance
- The dish itself is protected by an EU specification (TSG, PDO or PGI) that fixes how it is made.
- Defined by
- European Union
- Reference
- PGI ‘Sebadas/Seadas/Sabadas/Seattas/Savadas/Sevadas di Sardegna’, Regulation (EU) 2023/1426; specification as published in the Gazzetta Ufficiale of 3 August 2023
- Sources
- Gazzetta Ufficiale n. 180 of 3 August 2023, pp. 11–19: the PGI specification as registered (PDF, Italian)
- EU Official Journal C 103 of 20 March 2023: the application to register the PGI, with the single document (EUR-Lex, Italian)
- Commission Implementing Regulation (EU) 2023/1426, registering the PGI (EUR-Lex, Italian)
- Cookist: seadas (sebadas), the recipe (Italian)
- Eataly: Sardinian seadas, the traditional recipe (Italian)
- USDA Food Safety and Inspection Service: Leftovers and Food Safety (archived copy of 29 May 2025)
Ingredienti
Ingredients
For the dough
For the filling
To fry and serve
Equipment
- Kitchen scale
- Large bowl, or a stand mixer
- Non-stick pan and a wooden spoon, for the cheese
- Baking paper and a spoon
- Rolling pin or pasta machine
- Round cutters of 10 cm and 7 cm
- Fluted pastry wheel
- Wide non-stick frying pan with sides at least twice the depth of the oil, its lid, and a kitchen thermometer
- Slotted spoon and kitchen paper
Preparazione
Method
About 2 hours for 16 seadas, two each. Make the dough first and melt the cheese while it rests; while the cheese cools, roll the dough and cut the pastry discs. Filling, sealing and trimming take about 15 minutes; frying them two at a time about 20, just before serving.
- 1 h 27 minhands-on
- 8 mincooking
- 40 minresting, at least
The dough
-
Hands-on 2 min
Dissolve the 3 g of salt in the 150 g of lukewarm water.
Check No grains of salt left at the bottom.
-
Hands-on 3 min
Put the semolina in a large bowl, pour in the salted water and mix briefly, by hand or in a stand mixer, until the semolina has absorbed all of it.
Check No dry semolina left in the bowl.
-
Hands-on 10 minOfficial text
Combine all the dough ingredients and work them together, by hand or with a mixer.
Check A smooth, soft dough that no longer sticks to your hands.
Tip Add the lard a small piece at a time, letting each disappear into the dough before the next.
Tip Our guide: about 10 minutes of kneading in all.
-
Rest 20 min
Wrap the dough in film and leave it in the fridge for 20 minutes. Do not skip it: the rest makes the dough elastic and easy to roll.
The filling
Make it while the dough rests.
-
Hands-on 5 min
Cut the pecorino into small cubes. Grate the zest of the lemon, the yellow part only: the white pith is bitter.
-
Hands-on 5–10 minHeat lowestOfficial text
Melt the cheese over a low heat, with the grated lemon zest, until it is a thick mixture.
Check Completely melted into a thick, stringy mass, with no lumps left.
Tip Use a non-stick pan over the lowest heat and stir constantly with a wooden spoon.
Tip Our guide: 5–10 minutes.
-
Hands-on 3 min
Tip the melted cheese onto a sheet of baking paper and spread it with a spoon into an even layer about 7 mm thick. Work quickly: it stiffens as it cools.
Tip Our guide: at about 7 mm, the 500 g of cheese gives the 16 discs you need.
-
Rest 20–30 minOfficial text
Leave the cheese to cool.
Check Firm enough to cut cleanly, and no longer warm to the touch.
Tip Our guide: 20–30 minutes at room temperature.
-
Hands-on 5 minOfficial text
Cut the cheese into thin rounds.
Check 16 discs, about 30 g each.
Tip Use the 7 cm cutter.
Tip Warm the scraps in the pan again until soft, then spread and cut them the same way.
Shaping
-
Hands-on 10–15 minOfficial text
Roll the dough out thin, with a rolling pin or a pasta machine.
Check An even sheet all over, with no thick or thin patches.
Tip Our guide: about 2 mm. The specification allows 0.5 mm to 3 mm for each sheet, and this batch needs the dough that thin to give 32 discs.
Tip Roll on a lightly floured board, a piece at a time, keeping the rest wrapped.
-
Hands-on 10 minOfficial text
Cut the sheet into rounds.
Check 32 discs, two for each seada.
Tip Use the 10 cm cutter.
Tip Gather the scraps, roll them out again and cut more.
-
Hands-on 10 minOfficial text
Lay a cheese disc in the centre of a pastry disc, cover it with a second pastry disc and seal the two edges all the way round.
Check No air trapped round the cheese, and the edge sealed all the way round.
Tip Before sealing, press gently all round the cheese to push the air out: air left inside can split the pastry in the oil.
Tip Seal the edges firmly with your fingers.
-
Hands-on 5 min
Trim each seada with a fluted pastry wheel.
Check A wavy edge all the way round, still sealed.
Tip The specification allows a smooth or a wavy edge, decorated too.
Frying and serving
Fry them just before serving.
-
Cooking 8–10 minTemp 170 °CHeat medium-high
Pour peanut oil into a wide non-stick frying pan, about 2 cm–3 cm deep, and heat it to 170 °C, checking with a kitchen thermometer.
Check The thermometer reads 170 °C.
Tip Our guide: the depth, enough for the seadas to float free of the bottom as they puff.
Tip Use a pan whose sides are at least twice as high as the oil is deep: the seadas bubble hard as they fry. Never leave the oil unattended, and keep the pan's lid at hand: if the oil ever catches fire, turn off the heat and cover it, never pour water on it.
-
Hands-on 16–24 minTemp 170 °C
Lay two seadas in the oil and fry them, spooning the hot oil over the top all the time, so the typical small bubbles form on the surface, until golden: 2–3 minutes for each pair. Fry the rest the same way.
Check Golden, puffed and covered in small bubbles.
Tip Lower each seada into the oil gently with the slotted spoon, letting it slide in away from you, so the oil does not splash.
Tip Let the oil come back to 170 °C before each pair: more at once cool it, and the pastry turns greasy instead of crisp.
-
Hands-on 1 min
Lift each pair out gently, so as not to break the bubbles, and leave them on kitchen paper for a moment.
Check No oil pooling on the paper under them.
-
Hands-on 2 minOfficial text
Cover them with honey and serve them hot.
Tip Strawberry-tree honey here, or chestnut; sugar is the other topping the specification records.
The essentials, for cooks who know the dish. Switch to Detailed for quantities, temperatures, times and checks at every step.
Press “I’m here” on the step you are on, and again when it is done.Tap the pin on the step you are on, and the tick when it is done. Timers keep running while you scroll.
Da sapere
Good to know
- KeepingConservazione
- Best fried and eaten at once. Raw, they keep in the fridge on a tray dusted with semolina, well apart and covered with film: fry or freeze them the same day. To freeze them raw, set the tray in the freezer and, once they are firm, move them into freezer bags; fry them still frozen, a few seconds longer. Fried leftovers go into the fridge within 2 hours, in an airtight box, for 1–2 days: reheat them in a hot oven at 180 °C or in a non-stick pan until hot right through (75 °C at the centre), never in the microwave. Source
- VariantsVarianti
- With a raw filling: The specification's other way: the cheese mixed cold with the grated zest, and sugar if used, then laid between the sheets, with no melting. Source
- With goat's or cow's milk cheese: The specification allows goat's or cow's milk cheese, or cow's curd, alone or with pecorino; the cheese changes from one area of Sardinia to another. Source
- With orange zest or sugar: Grated orange zest with the lemon, or in its place, and a little sugar in the filling, as the specification allows. Source
- Baked: A lighter version: baked at 180 °C for 15 minutes instead of fried. They come out less crisp. Source
Errori comuni
Common mistakes
- Rolling the sheets thick: the specification allows 3 mm at most for each one, and about 2 mm gives the 32 discs this batch needs.
- Leaving air round the cheese: it can split the pastry in the oil, and the filling runs out.
- Frying more than two at a time: the oil cools and the pastry turns greasy instead of crisp.
- Using an aged pecorino: the filling needs a fresh cheese that melts and turns stringy.
- Skipping the dough's rest: it is what makes the dough elastic and easy to roll.
Fuori dall'Italia
Cooking it outside Italy
- Fine durum wheat semolina (semola rimacinata) is sold as semolina flour or durum flour; the specification also allows soft wheat flour.
- If you cannot find fresh pecorino sardo, the specification allows a fresh goat's or cow's milk cheese, or cow's milk curd: choose a young one that melts into strings.
- Use lard, not butter or oil: lard is the only fat the specification names, and it is what makes the pastry friable.
- Any dark, slightly bitter honey can stand in for strawberry-tree honey, such as chestnut; or use sugar, which the specification also records.