Ferrara, Emilia-Romagna
Pampapato di Ferrara
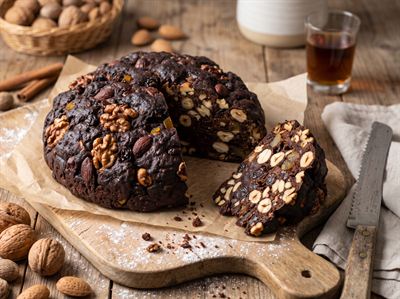
Ferrara's chocolate-covered spiced Christmas cake
Ferrara's Christmas sweet, a PGI since 2015: a dome of spiced dough of flour, cocoa, sugar, candied peel and toasted unpeeled almonds, baked, left to mature for days, then wholly covered in dark chocolate.
- Course
- DolciDesserts
- Serves
- 20
- Hands-on
- 1 h 49 min
- Cooking
- 1 h 30 min
- Plan
- 3 days
In breve
In short
Also called Pampepato di Ferrara, Pampapato di Ferrara IGP, Pampepato di Ferrara IGP, Panpepato di Ferrara, pampapato ferrarese, pampepato ferrarese, Pan del Papa and Ferrara pampapato.
- Vegetarian
- Type 0 flour, candied citrus peel, toasted unpeeled almonds, sugar, cocoa, nutmeg, cinnamon, leavening and water; no eggs, milk, butter or oil.
- Flour is 30–40% of the dough and candied peel 20–30%; the spices are only 0.1–0.2%, with nutmeg and cinnamon always among them.
- The sugar is dissolved in water without colouring, then all the ingredients are kneaded by machine for 35–45 minutes.
- Shaped as a dome with a flat base, baked at 180 °C–220 °C, matured for 1–4 days, then wholly covered in dark chocolate of at least 54% cocoa.
- No colourings or preservatives; once the coating has set, each cake is sealed in its wrapper and handled as little as possible.
La provenienza
Where this recipe comes from
Pampapato, or pampepato, is the Christmas sweet of Ferrara: a dome of dark, spiced dough studded with almonds and candied peel and wholly covered in dark chocolate. Its specification traces it to the sixteenth century and the enclosed nuns of the convent of Corpus Domini in Ferrara, who made a spiced bread to send to high prelates at Christmas, while at the Este court lavish banquets ended with sweets much like spiced breads; other accounts place the nuns' sweet in the seventeenth century and say they took their cue from an old recipe of the great Renaissance cook Cristoforo da Messisbugo. Held to be a rich sweet worthy of a pope, it was given to high prelates by Ferrara's clergy and nobility, who shaped it like a cardinal's skullcap, the papalina; from that custom and from its spices its two names, pampapato and pampepato, seem to come. When Ferrara passed to the Papal States, the story goes, the Duke's bread became the Pope's bread. The old recipe used flour, water, honey (later replaced by sugar), cocoa, ginger and cinnamon, candied peel, almonds in their skins and a little salt; the dough cooled on marble and matured in the fog of the Po valley before it was coated with chocolate. Its wider fame came later: in 1902 a pastry maker who had perfected an old recipe by covering the spiced bread in chocolate opened a workshop in the heart of the old town, and as other bakers, home cooks and pastry shops took it up, it became the sweet that stands for Ferrara. At Christmas the people of Ferrara still give it to relatives, friends and colleagues.
‘Pampapato di Ferrara’ or ‘Pampepato di Ferrara’ has been a PGI since 2015, by Commission Implementing Regulation (EU) 2015/2267: only pampapato made in the province of Ferrara under the specification may carry the name, and every stage, from dissolving the sugar to the chocolate coating, must happen there. The specification, published in the Gazzetta Ufficiale on 21 January 2015, sets the dough per 100 kg before baking: type 0 soft wheat flour, 30–40 kg; candied orange, lemon and citron peel, 20–30 kg; toasted sweet almonds in their skins, 7–23 kg; granulated sugar, 10–20 kg; unsweetened cocoa with 22–24% cocoa butter, 5–15 kg; spices, nutmeg and cinnamon always among them, 100–200 g; leavening and water as needed. Wildflower honey, in place of part of the sugar, and toasted hazelnuts are allowed within limits, and there are no colourings or preservatives. The sugar is dissolved in water without colouring, the dough worked for 35–45 minutes and shaped into a dome with a flat base, 3–35 cm across and 1.5–8 cm high, baked at 180–220 °C for 15–90 minutes by size, matured for 1–4 days at 75–90% relative humidity (or soaked in an orange-flavoured alcoholic solution instead), and then covered entirely in melted extra dark chocolate with at least 54% cocoa, 10–14 kg per 100 kg of dough.
The specification sets ranges for producers, not a household recipe, and the home recipes we compared all fall outside them, with less candied peel and more spice than it allows. The batch on this page is our own composition, about 1.25 kg of dough with every ingredient inside its range, and it has not yet been tested in a home kitchen: the amounts, the water, the size of the cakes, the baking (180 °C for about 55 minutes, until the centre reaches about 95 °C) and the tempering of the chocolate are our guide, the method follows the specification's order, and every step has a check to judge it by. A home kitchen has no room held at 75–90% humidity, so here the cakes mature for two days in a closed box, which keeps their own moisture in but does not control it. The specification's moisture, 5–35%, cannot be measured at home, and this batch has not been measured against it. Made outside the province of Ferrara, it is pampapato in the Ferrara manner, not Pampapato di Ferrara.
- Provenance
- The dish itself is protected by an EU specification (TSG, PDO or PGI) that fixes how it is made.
- Defined by
- European Union
- Reference
- PGI ‘Pampapato di Ferrara / Pampepato di Ferrara’, Commission Implementing Regulation (EU) 2015/2267; production specification published in the Gazzetta Ufficiale no. 16 of 21 January 2015 and by the Ministry of Agriculture
- Sources
- Ministry of Agriculture (MASAF): the production specification of the PGI ‘Pampapato di Ferrara / Pampepato di Ferrara’ (Italian)
- Gazzetta Ufficiale no. 16 of 21 January 2015: the Ministry's proposal to recognise the PGI, with the production specification (Italian)
- EU Official Journal C 238 of 21 July 2015: the application to register the PGI, with its single document (EUR-Lex, Italian)
- Commission Implementing Regulation (EU) 2015/2267, registering the PGI (EUR-Lex, Italian)
- Travel Emilia-Romagna, the regional tourism agency's blog: the pampapato of Ferrara, its recipe and tradition (Italian)
- Ferrara Terra e Acqua, the official tourist site of the province of Ferrara: pampepato or pampapato di Ferrara (Italian)
- Ferrara Terra e Acqua, the official tourist site of the province of Ferrara: the pampepato recipe (Italian)
Ingredienti
Ingredients
The almonds and the candied peel (doesn't change with servings)
The syrup and the cocoa paste (doesn't change with servings)
The flour and the spices (doesn't change with servings)
The coating (doesn't change with servings)
Equipment
- Kitchen scale, for the dough and the cakes too; one precise to 0.1 g helps with the spices, which weigh under 2 g in all
- Stand mixer with a dough hook: the specification kneads by machine, for 35–45 minutes
- Small roasting tin, for the almonds
- Small saucepan and a wooden spoon
- Baking tray, about 30 cm by 40 cm, and baking paper
- Oven thermometer, and a probe thermometer for the cakes and the chocolate
- Wire rack
- A lidded box or cake tin big enough for both cakes
- A board or flat tray that fits on the scale, for coating
- Heatproof bowl and a pan that holds it, for the bain-marie
- Palette knife or flexible spatula
- Nutmeg grater
- Cellophane bags or kitchen foil, for wrapping
Preparazione
Method
Our guide: the specification gives ranges per 100 kg of dough, not a recipe; these quantities are ours, about 1.3 kg of dough with every ingredient inside its range, not yet tested in a home kitchen. Start three days before you want to serve it. Day one takes about 4 hours 30 minutes, most of it waiting: 15 minutes for the oven to heat while you weigh everything and dice the peel, 25 to toast the almonds while you make the syrup and the cocoa paste and let it cool, about 40 to knead, 10 to weigh and shape the dough, about 55 in the oven and 2 hours to cool. The cakes then mature for two days in a closed box. Day three takes about 2 hours: 20 minutes to temper the chocolate, about 30 to weigh and coat the cakes, at least an hour for the chocolate to set, and a few minutes to wrap. The batch makes two pampapati of about 630 g of dough each, cut into 20 wedges.
- 1 h 49 minhands-on
- 1 h 30 mincooking
- 3 daysfrom start to table
Day one: the almonds, the peel and the syrup
-
Cooking 15 minTemp 150 °C
Heat the oven to 150 °C, static (top and bottom heat). Meanwhile weigh all the ingredients and line the baking tray with baking paper.
Check The oven has reached 150 °C: its light has gone off, or the oven thermometer reads it.
-
Hands-on 10 min
While the oven heats, cut the candied orange peel and citron into small cubes, about 5 mm across.
Check Even cubes, none bigger than a pea; pull apart any that stick together.
Tip Candied lemon peel is allowed too, alone or with the others, within the same 280 g.
Tip The specification lets the candied orange peel go in as cubes or as a fine paste (see the variants); the 5 mm cubes are ours.
-
Cooking 25 minTemp 150 °COfficial text
If the almonds are not already toasted, toast them in the oven for 25 to 60 minutes at no more than 200 °C.
Check Fragrant; an almond broken in half is pale gold inside, never brown.
Tip Our guide: spread them in the small roasting tin and toast them at 150 °C for 25 minutes, stirring halfway. Then turn the oven up to 180 °C, ready for baking, and leave the almonds to cool in the tin.
Tip Our guide: leave them whole. The specification wants sweet almonds, toasted and in their skins, and they give the cake its crunch.
-
Hands-on 5 minHeat lowOfficial text
Dissolve the granulated sugar in water until it is completely liquid. When it is done, the sugar must not be caramelised or show any light or dark brown colour.
Check A clear, colourless syrup, with no crystals left on the spoon or on the bottom of the pan.
Tip Our guide: while the almonds toast, put the 150 g of sugar and 130 g of water in the small saucepan over low heat and stir until clear, 3–5 minutes. Take it off as soon as it is clear. It needs no boiling: boiling drives off water the dough needs, and boiled long it would colour, which the specification forbids.
Day one: the dough
-
Hands-on 3 minOfficial text
Work the unsweetened cocoa powder together with the sugar dissolved in the water until it makes a dough, which must be dense and well mixed.
Check A thick, glossy, very dark paste, with no dry lumps of cocoa.
Tip Our guide: put the cocoa in the mixer bowl, pour the warm syrup over it and stir with a spoon until smooth.
Tip The specification's main method works all the ingredients together at once; it also allows this order, cocoa and syrup first, which this page follows.
-
Rest 10 min
Leave the paste in the bowl for about 10 minutes, until only lukewarm.
Check Barely warm against a fingertip.
Tip Our guide: the flour and baking powder go in only now, so that the baking powder does not start working in hot syrup.
-
Hands-on 35–45 minOfficial text
Add the remaining ingredients and work everything mechanically for 35 to 45 minutes, adding as much water as needed to make the work easier, until the dough is even.
Check A firm, even dough that holds together in one mass and leaves the bowl almost clean; slightly tacky but not sticky, with the almonds and peel spread right through.
Tip Our guide: mix the flour with the baking powder, cinnamon and nutmeg, and add it to the paste with the diced peel and the almonds. Knead with the dough hook on the lowest speed; if the motor runs hot, stop it for a few minutes.
Tip Our guide: the specification kneads by machine. Without a mixer, kneading by hand on the worktop for the same time is this page's departure from it.
Tip Our guide: if after 5 minutes the dough is still crumbly, add water a tablespoon (15 g) at a time, up to 80 g more. Never go past 210 g of water in all: much more and the flour falls below 30% of the dough, the specification's minimum. If it is still dry, knead on rather than add more.
Day one: shaping and baking
-
Hands-on 10 minOfficial text
Portion the dough by hand, then shape and finish each piece into a round dome, the ‘calotta’, with a flat base and a convex top.
Check Two smooth domes about 14 cm across and 5 cm–6 cm high, flat underneath, with no cracks; the dough's weight written down.
Tip Our guide: first weigh the whole dough and write the weight down: on day three the chocolate coating is measured against it.
Tip Our guide: divide the dough into two equal pieces of about 630 g. With lightly floured hands, roll each into a ball, set it on the lined tray and press the base flat, keeping the top rounded like a skullcap. Leave at least 6 cm between them.
Tip The specification allows any size from 3 cm to 35 cm across, 1.5 cm to 8 cm high and 10 g to 3 kg in weight; smaller or bigger cakes need a shorter or longer bake, within its 15–90 minutes.
-
Cooking 50 min to 1 hTemp 180 °COfficial text
Bake in the oven at 180 °C–220 °C for 15 to 90 minutes, according to size.
Check The top is firm and dry; a skewer pushed into the centre comes out with no wet dough, and a probe there reads about 95 °C.
Tip Our guide: the tray on the middle shelf, at 180 °C static, for about 55 minutes. Check from 50 minutes, and never go past 90, the specification's limit.
Tip Our guide: the dough is dark with cocoa, so its colour tells you little. Watch for a smell of scorching instead: burnt, it turns bitter. If the top darkens too fast, lay a sheet of foil loosely over it.
-
Rest 2 h
Lift the cakes onto the wire rack and leave them until cold right through, about 2 hours.
Check The base and the middle of the top feel cool to the touch.
Tip Cold before they go in the box: warm cakes closed in would sweat.
Days two and three: maturing
-
Rest 2 daysOfficial text
After baking, keep the cakes for 1 to 4 days in a room at 75–90% relative humidity.
Check No mould or damp spots; pressed gently, the top gives a little more than when it went in.
Tip Our guide: a home kitchen has no room held at that humidity. Put the cold cakes in a lidded box or cake tin, close it and keep it in a cool place, out of the sun, for 2 days. The box keeps their own moisture in, so the crust can soften as it evens out with the inside, but it does not control the humidity: this is where the home version differs most from the specification.
Tip The specification also allows the maturing to be replaced by soaking the baked cakes in an orange-flavoured alcoholic solution: see the variants.
Day three: the chocolate
-
Hands-on 20 minHeat low
Chop the chocolate finely. Melt 125 g of it in the heatproof bowl over barely simmering water, the bowl clear of the water, to about 50 °C. Take it off the heat and stir in the other 55 g until the chocolate has cooled to 31 °C–32 °C.
Check A dab on a strip of baking paper sets glossy and snaps cleanly within about 5 minutes in a cool room.
Tip Why: the specification wants a glossy, dark brown surface and counts cocoa butter rising to the surface as a fault. Chocolate that has not been tempered sets soft, dull and streaked.
Tip Our guide: if pieces are still whole when it reaches 31 °C–32 °C, lift them out. If it falls below 31 °C, warm it over the water for a few seconds, stirring, never above 32 °C.
Tip If the test stays soft or streaky, stir a few minutes more and test again. Work in a cool room, below about 20 °C.
-
Hands-on 2 min
Line a board or flat tray with baking paper, set both cakes on it upside down, weigh it all and write the weight down.
Check Two weights written down: the dough's, from shaping, and this one.
Tip Our guide: the specification wants 10–14% of the weight of the dough in chocolate on the cakes. Work out your limits now: a tenth of the dough's weight is the least, 14% the most, and about an eighth is the aim. For 1.3 kg of dough: at least 125 g, at most 175 g, about 160 g.
-
Hands-on 5 min
With the palette knife, spread a thin layer of chocolate over the flat base of each cake, leaving the cakes upside down on the paper.
Check Each base is covered edge to edge, with no dough showing.
Tip Our guide: spread, never pour: poured chocolate runs off, and what runs off is not on the cake.
-
Rest 10 min
Leave the cakes base-up for about 10 minutes, until the chocolate on the bases has set.
Check The chocolate on the bases has set: firm to a light touch, and no longer wet.
Tip Our guide: meanwhile keep the bowl at 31 °C–32 °C: if it falls below, warm it over the water for a few seconds, stirring, never above 32 °C.
-
Hands-on 10 minOfficial text
Once the maturing is over, cover each cake entirely with the melted extra dark chocolate.
Check No dough shows anywhere; the coat is smooth, even and glossy, and nothing is left running on the paper.
Tip Our guide: turn the cakes right way up on the same paper. Spoon chocolate onto the tops and spread it down the sides with the palette knife until no dough shows. Scrape anything that runs onto the paper back up onto the cake while it is still soft.
-
Hands-on 2 min
Weigh the board with the cakes again. What they have gained is the chocolate on them.
Check They have gained at least a tenth of the dough's weight and no more than 14%; about an eighth is right.
Tip Our guide: if they are short, spread on more from the bowl, warmed over the water for a few seconds if it has thickened, never above 32 °C, and weigh again. The 180 g allows for what stays in the bowl and on the knife.
-
Rest 1 hOfficial text
Leave the cakes to cool until the coating has completely set.
Check The coat is hard and glossy, and a light touch leaves no mark.
Tip Our guide: at least an hour in a cool room, about 15 °C–20 °C; not in the fridge, where damp can mark it.
-
Hands-on 5 minOfficial text
Wrap each cake in at least one sealed protective wrapper of cellophane, aluminium or another food-grade material.
Check Each cake is closed on every side, with no gaps.
Tip Our guide: slide each into a cellophane bag and tie it tight, or wrap it in foil, holding it by the base and as little as possible.
Tip Handled further, the specification says, the coating loses its gloss, can melt, and the cocoa butter rises to the surface.
-
Hands-on 2 min
Unwrap a cake and cut it into 10 wedges with a sharp knife, its blade warmed in hot water and dried.
Check Cut, it is brown inside, compact with small holes, with the almonds and candied peel spread through it; the coating and the almonds crunch against the soft dough.
Tip The specification describes its scent: chocolate first, then the spices, nutmeg and cinnamon above all, the candied peel and the toasted almond.
The essentials, for cooks who know the dish. Switch to Detailed for quantities, temperatures, times and checks at every step.
Press “I’m here” on the step you are on, and again when it is done.Tap the pin on the step you are on, and the tick when it is done. Timers keep running while you scroll.
Da sapere
Good to know
- WhenQuando
- Christmas: in Ferrara it ends the big Christmas lunch, though more and more it is eaten at other times of the year too. Source
- KeepingConservazione
- Once the chocolate has set, each cake is closed in a sealed wrapper of cellophane or foil and handled as little as possible: handled further, it loses its gloss, the coating can melt and the cocoa butter rises to the surface. Source
- VariantsVarianti
- With honey: The specification allows wildflower honey, up to 5% of the dough, in place of part of the sugar. On our reading, the sugar stays at or above 10% of the dough, its own minimum: in this batch, up to about 20 g of honey in place of the same weight of sugar, stirred into the syrup once it is off the heat. Source
- With hazelnuts: The specification allows toasted hazelnuts as well as the almonds, never instead of them, at 5–8% of the dough. In this batch that is about 70 g, toasted with the almonds, with the water kept to 175 g in all so that the flour stays above 30% of the dough. Source
- With the orange peel as a paste: The candied orange peel may go in minced very finely to a paste instead of in cubes, as long as the paste is no more than 40% of the candied fruit: here up to 110 g of the 280 g. Source
- Soaked instead of matured: Instead of maturing for 1 to 4 days, the baked cakes may be dipped in an orange-flavoured alcoholic solution to bring them to the specification's moisture; traces of the soak may remain on them. The specification gives no recipe for the solution. Source
- A smaller home batch, with more cocoa and spice: 200 g of type 0 flour with 100 g each of toasted unpeeled almonds, coarsely chopped, granulated sugar or honey, cocoa with 22–24% cocoa butter and diced candied orange, lemon and citron peel, 2 g of cinnamon and 2 g of nutmeg or ground cloves, kneaded for 35–45 minutes with water as needed until firm, shaped into small domes, baked at 160 °C for about 1 hour 15 minutes and, once cool, covered with 80 g of dark chocolate melted in a bain-marie. With less candied peel than the specification's minimum, more than twice its most spice and a cooler oven, it falls outside the specification, so it is not PGI pampapato. Source
Errori comuni
Common mistakes
- Letting the sugar syrup boil until it colours: the specification wants it fully dissolved but never caramelised or brown.
- Using blanched almonds: the specification wants sweet almonds, toasted, in their skins.
- Adding eggs, milk, butter or oil: the dough has none, only water to bind it.
- Spicing it like gingerbread: the specification's spices are only 0.1–0.2% of the dough, here under 2 g in all, with nutmeg and cinnamon always among them.
- Adding much more than 210 g of water in all: the flour falls below 30% of the dough, the specification's minimum.
- Baking below 180 °C, as some home recipes do: the specification bakes at 180–220 °C.
- Coating the cakes straight after baking: the specification matures them for 1 to 4 days first.
- Coating them with chocolate that has not been tempered: it sets soft, dull and streaked, not glossy as the specification wants it.
- Pouring the chocolate over a rack and losing the drips: the coat can end up under the specification's minimum, a tenth of the dough's weight. Spread it, and weigh the cakes before and after.
- Using milk chocolate, or dark chocolate under 54% cocoa, for the coating.
- Handling the coated cakes, or leaving them unwrapped: the gloss dulls, the coating can melt and the cocoa butter rises to the surface.
Fuori dall'Italia
Cooking it outside Italy
- Type 0 is an Italian soft-wheat flour: plain flour (all-purpose in the US) is the nearest equivalent.
- Candied citron (cedro) is the candied peel of the citron, not of the lemon. Italian delicatessens sell it, and candied orange peel, in large pieces; dice both yourself.
- For the cocoa, look on the label for about 22 g–24 g of fat per 100 g: the specification asks for 22–24% cocoa butter.
- Buy natural almonds with their brown skins, not blanched ones.
- Any baking powder will do: lievito per dolci, the Italian kind, is one.
- For the coating, choose a dark chocolate labelled 54% cocoa or more.