Sardinia (the whole island), Sardegna
Pane Coccoi
Sardinian durum wheat bread, shaped and cut by hand
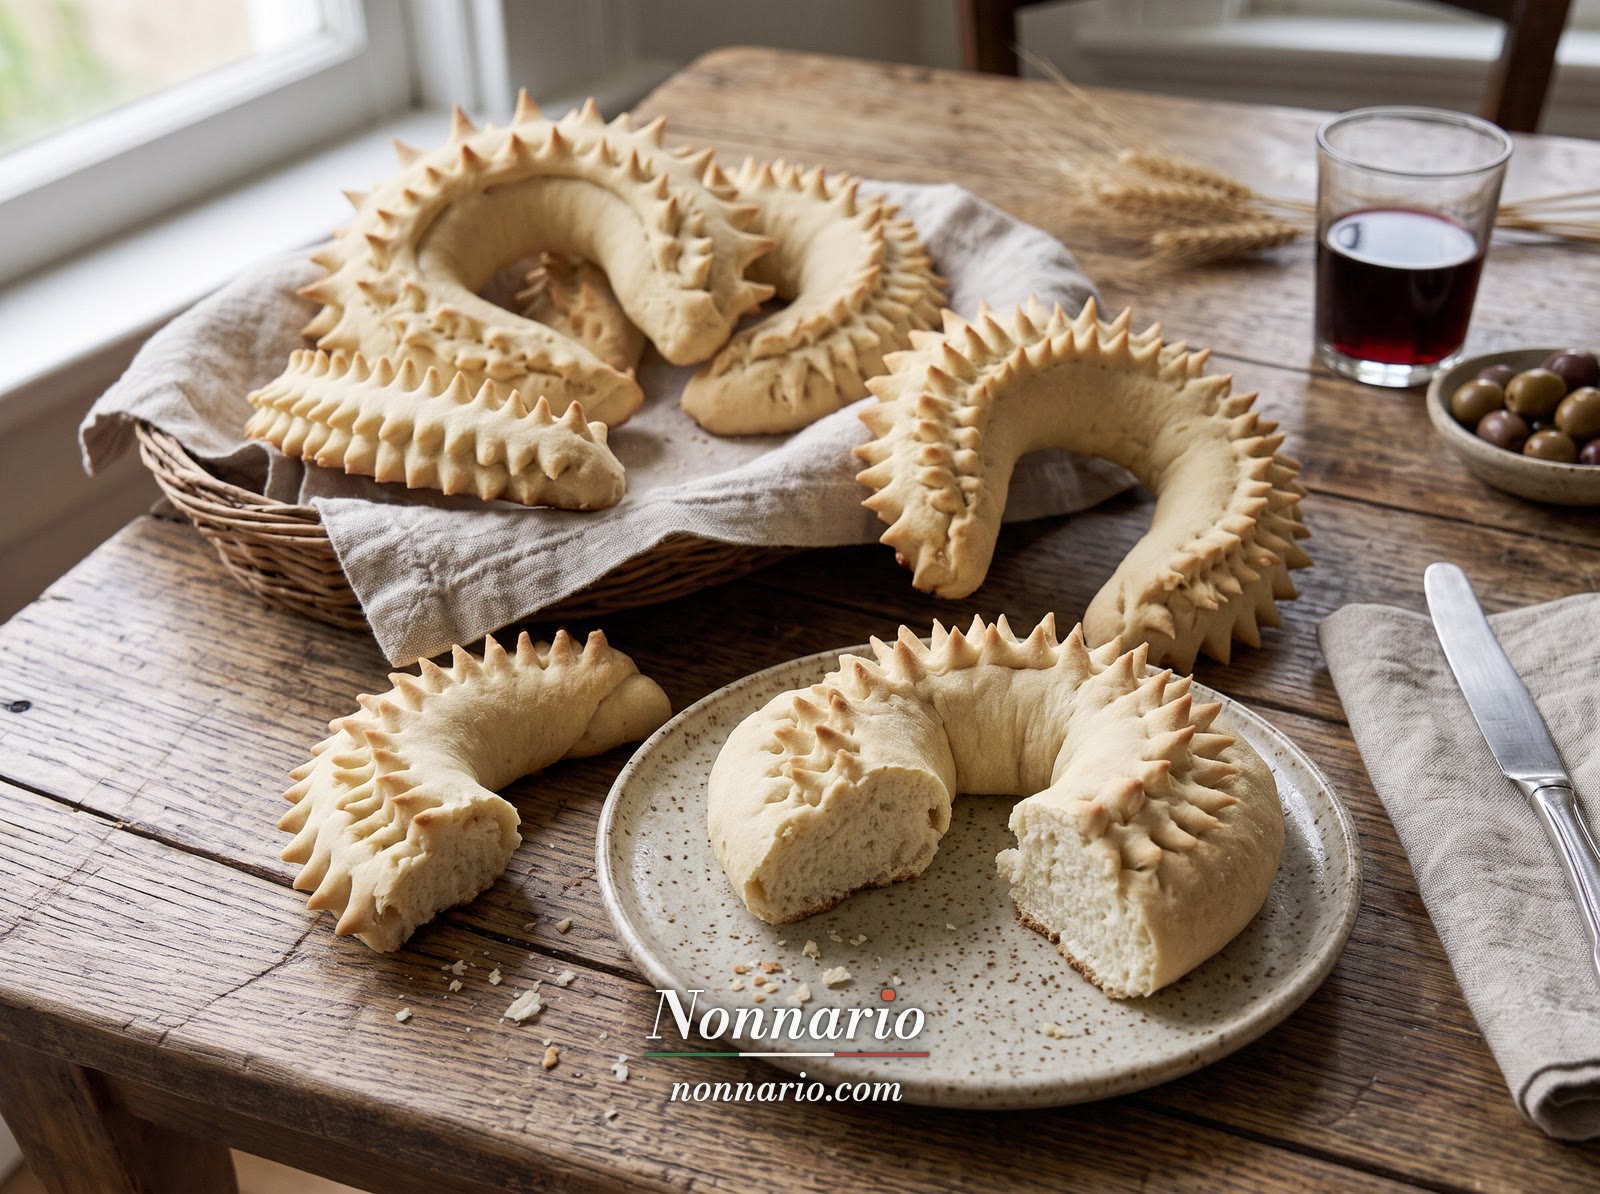
The decorated bread of Sardinia: a firm dough of durum wheat semola, water, salt and leaven, shaped by hand into rings, horseshoes and S shapes and snipped with scissors into points, now awaiting EU protection as a PGI.
The PGI has been applied for in the EU (file PGI-IT-03513) but not yet granted, and its specification may still change before it is.
- Course
- Pizze e PaniPizza & Bread
- Serves
- 6
- Hands-on
- 1 h 2 min
- Cooking
- 40 min
- Resting
- 1 h 20 min+
The video and the photos of every step are also gathered on a separate page.
In breve
In short
Also called Coccoi, Su coccoi, Coccoi a pitzus, Su scetti, Pasta dura and Coccoi de is sposus.
- Vegetarian
- Vegan
- Durum wheat semola, water, sea salt and a leaven (lievito naturale, or brewer's yeast, which the specification allows); never a chemical raising agent.
- A firm dough, a pasta dura: 600 g of semola to about 300 ml of water, worked until smooth and velvety.
- Shaped by hand as a flat-based round, a pointed oval, a horseshoe, a ring or an S, from 30 g to 1 kg a piece.
- Cut with scissors, a knife or a toothed wheel into points and lace (pitzus): before the rise, and again with scissors after it.
- One rise only, after shaping, of about an hour; then about 40–45 minutes at 200 °C, with a tin of water for shine if you like.
La provenienza
Where this recipe comes from
Coccoi is the bread of Sardinia that is cut and shaped by hand: a firm dough of durum wheat, worked smooth, formed into rings, horseshoes, ovals and S shapes, and snipped with scissors into small points and lace, the pitzus. In Sardinian the word also names certain sea and land snails, and some scholars trace it to the Latin cochlea, from the Greek; the main form is a ring, like a crown. The bread is written about from 1805 on. Giovanni Spano's Sardinian dictionary of 1851 gives coccoi as a bread shaped like a garland, and coccoi de pizzus as bread made with battlements; in 1870 Benvenuto Gasparoni compared it with the garland bread of the Romans; a gastronomic guide to Italy of 1931 described Sardinian bread as very white, of firm dough and little risen, keeping well for days, and named the coccòi of the Campidano among it. In the past it was the bread of Sundays and special occasions, weddings (coccoi de is sposus) and Easter, and Sardinian women learned it as girls, making it once a week. The specification tells how the everyday loaf is simply worked, while one made for a time of the year or a sacrament is richer and full of meaning, its shapes recalling fruits, objects and the nature of the island. Today, it says, every bakery in Sardinia makes some every day, more at certain times of the year, and a Sardinian baker's training always includes it.
The promoting committee for Pane Coccoi first worked for three years towards a PDO, then applied for a PGI. After a public hearing in Cagliari on 3 March 2026, the Ministry of Agriculture published the proposed specification in the Gazzetta Ufficiale of 9 April 2026 for national objections, and the application now stands on the EU register, not yet granted. The specification is the recipe this page follows: the ingredients (durum wheat semola, water, lievito naturale or brewer's yeast, sea salt, and optionally eggs, almonds or sultanas as decorations only), the order in which they meet, so that the leaven never touches the salt, and every phase, from rolling the dough smooth to the scissor cuts before and after the rise. It covers the whole of Sardinia and does not require Sardinian wheat. It gives no quantities, times or temperatures: every ingredient after the semola is as much as needed. So the batch of six breads, the rise and the oven on this page come from a tested household recipe, listed in the sources, set inside the specification's method. That recipe is an Easter bread with an egg on each, set aside here as a variant with its separate dough for decorations. It also mixes the salt in last and lets the dough double for about two hours before shaping, while the specification adds the leaven after the salt and lists no rise before shaping; this page follows the specification, so the shaped breads have their one rise. Our own parameters are marked Our guide. Made outside Sardinia, or before the PGI is granted, it is a home version of the protected bread.
- Provenance
- An application to protect the dish in the EU (TSG, PDO or PGI) is under way; this page follows its specification as it stands, which may change before it is granted.
- Defined by
- Comitato promotore Pane Coccoi IGP, through the Ministry of Agriculture (MASAF)
- Reference
- Proposed specification of the PGI ‘Pane Coccoi’, published for national objections in the Gazzetta Ufficiale n. 82 of 9 April 2026; EU application PGI-IT-03513, not yet registered. The batch, the rise and the bake follow La Cucina Italiana's Easter recipe of 2026, without its eggs and decorations dough (a variant here), with the salt added before the yeast, and without its first rise, which the specification's phases do not have.
- Sources
- Gazzetta Ufficiale n. 82 of 9 April 2026, pages 22–25: Ministry of Agriculture (MASAF), the application for the PGI with the proposed specification in full, published for national objections (Italian)
- EU register eAmbrosia: the record of the application for the PGI ‘Pane Coccoi’, PGI-IT-03513, status applied
- Laore Sardegna (the Region of Sardinia's agricultural agency): Coccoi a pitzus, traditional agri-food product sheet, from the official list (Italian)
- La Cucina Italiana: Coccoi cun s'ou, the Sardinian Easter bread, recipe by Giorgia Dessì, 2026 (Italian)
- L'Unione Sarda (Cagliari daily): Su Coccoi, the traditional Sardinian bread, by Marco Scano, 2025 (Italian)
- ANSA (Italian news agency): Pane Coccoi, a step towards PGI protection, 5 February 2026 (Italian)
- USDA Food Safety and Inspection Service: Leftovers and Food Safety, on cooling, keeping and reheating cooked food (archived copy)
Ingredienti
Ingredients
The original recipe serves 6
Equipment
- Kitchen scale and a thermometer, for the water
- A large bowl, or a stand mixer with a dough hook
- A rolling pin
- A dough scraper or a large knife, to divide the dough
- Sharp kitchen scissors with fine points, and a small sharp knife
- A toothed pastry wheel, if you have one
- Two baking trays, the oven's own (about 35 cm by 45 cm), lined with baking paper, three breads on each
- Two or three clean cotton cloths, to cover the breads as they rise
- A metal tin for water on the lowest shelf of the oven, and a kettle
- A probe thermometer, for the bread
- A wire rack
Preparazione
Method
Scaled to 6 servings: the amounts in the steps follow. Pot and pan sizes and cooking times are still for the original 6.
About 3–4 hours from weighing to the rack, 1–1½ hours of it hands-on, most of the rest the rise and the bake. Heat the oven while the breads rise. With lievito madre in place of brewer's yeast the rise takes several hours, so allow a long morning or afternoon. The quantities make six breads of about 150 g each; for six, two baking trays, the oven's own (about 35 cm by 45 cm), three breads on each.
- 1 h 2 minhands-on
- 40 mincooking
- 1 h 20 minresting, at least
The dough
The specification allows a direct method, with the leaven worked straight into the dough, or an indirect one with a pre-dough (see the variants). This page uses the direct method. Either way the leaven must never touch the salt directly, so the semola, water and salt are mixed first and the yeast goes in after.
-
Hands-on 5 minTemp 30 °C
Weigh the 600 g of semola into a large bowl, or the bowl of a stand mixer. Measure the 300 ml of lukewarm water, and pour about 50 ml of it into a cup. Crumble the 20 g of yeast into the cup and stir until it has dissolved. Weigh the salt.
Check The water reads about 30 °C, warm to the wrist but not hot, and the yeast has dissolved into a milky liquid.
Tip Our guide: with lievito madre, break the 120 g of starter into those 50 ml of water and squeeze it between your fingers until it is a thick, smooth cream.
Tip Our guide: with dried yeast, stir the 7 g into the cup of water and leave it 5 minutes.
-
Hands-on 3 minOfficial text
Mix the semola with the water and the salt, working them gradually, by hand or with a mixer.
Check A rough, lumpy, rather dry dough with no dry semola left in the bowl.
Tip Our guide: pour the rest of the water, about 250 ml, over the semola, scatter the salt over it and work it in with your hand or the dough hook on low speed. Keep the cup of yeast to one side.
-
Hands-on 10–12 minOfficial text
Then add the leaven and go on working the dough until it reaches the consistency you want.
Check A firm, compact dough, smooth and no longer sticky, that holds a dent from your finger. It is stiffer than most bread doughs and only a little elastic.
Tip Our guide: pour the dissolved yeast into a hollow in the middle of the dough, fold the dough over it and knead about 10 minutes by hand on the board, pushing it away with the heel of your hand and folding it back, or 6–8 minutes with a dough hook on low speed.
Tip Our guide: it is a pasta dura, a firm dough, and should feel hard work at first. Add water only a spoonful at a time, and only if dry crumbs will not come together after 5 minutes: the firmness is what keeps the cuts sharp in the oven.
Tip Our guide: the kneaded dough should be about 24 °C–26 °C.
Rolling smooth and shaping
The specification's phases go straight from rolling the dough smooth to dividing, shaping and decorating it; its only rise comes after, once the breads are shaped.
-
Hands-on 8–12 minOfficial text
Divide the dough into pastoni, large pieces of the weight you want; then put them through the rollers, or work them by hand, until the rough, lumpy mass becomes a thick, broad sheet, even, smooth and velvety to the touch.
Check The surface is smooth and satiny with no lumps or tears, and the sheet folds without cracking.
Tip Our guide: for this batch the whole dough is one pastone.
Tip Our guide: at home, flatten the dough with a rolling pin into a sheet about 1.5 cm thick, fold it in three, turn it a quarter and roll it out again. Repeat 5–8 times. If it springs back and will not roll, cover it with a cloth and leave it 5–10 minutes, then go on.
Tip Our guide: bakers use a sheeter, a machine with two rollers; the specification allows the work by hand as well.
-
Hands-on 3 minOfficial text
Divide the dough into pieces with a cutting tool: a scraper, a knife, scissors or a toothed wheel. The specification allows pieces from 30 g to 1 kg.
Check Six pieces of about 150 g each.
Tip Our guide: weigh the whole dough, about 925 g, and divide by six. Keep the pieces you are not working on under a cloth so they do not dry.
-
Hands-on 12–20 minOfficial text
Work each piece by hand into the shape you want, still without decoration: a round, apple-like ball with a flat base; a rope or pointed oval with a flat base and tapered ends; a rope bent into a horseshoe; a rope closed into a ring, like a crown; or a wavy rope, like an S or a double S.
Check Each piece is smooth, with no cracks, and lies flat on its base.
Tip Our guide: for a ring, roll a piece under your palms into a rope about 40 cm long, of even thickness, press its ends together with a little overlap and pinch the join closed. Laid flat it makes a ring of about 12 cm–13 cm across.
Tip Our guide: flatten each shape slightly with your palm, so that it has a flat base and a top about 2 cm high to cut.
-
Hands-on 10–20 minOfficial text
Decorate each shape with a knife, scissors, a toothed or smooth wheel, or simply the pressure of your fingers, into points, lace, fringes, animals or birds, alone or together, until it has the form you want.
Check Every shape has a clear pattern of teeth or notches all round; the cut pieces are still attached to the bread.
Tip Our guide: for a ring, cut the outer edge of the base with the knife every 1 cm, about 1 cm deep, and pinch each tooth to a point, or run a toothed wheel round it; then notch the top with the knife in a herringbone or a row of small V shapes.
Tip Our guide: these are the points the oven opens: cut cleanly and not too deep, so that they stay attached.
Tip Our guide: eggs, almonds or sultanas, if you use them, go on now (see the variants).
The rise
-
Hands-on 2 minOfficial text
Lay the decorated shapes on a rigid surface and, if you like, cover them with cloths.
Check Three breads on each of the two trays, about 4 cm apart and clear of the edges, with the cloth resting loosely over them.
Tip Our guide: two baking trays, the oven's own (about 35 cm by 45 cm), lined with baking paper, three breads on each, so they rise on the trays they bake on. Set two side by side along one long edge and the third opposite, between them, so that the rings of about 14 cm have room to grow.
-
Hands-on 2 minTemp 200 °C
Set two shelves in the middle of the oven, put a metal tin on the lowest shelf below them and heat the oven, static, to 200 °C. It needs at least 30 minutes, so switch it on soon after the breads are covered.
Check When the breads are ready, the oven has been at 200 °C for at least 15 minutes.
Tip Our guide: put the kettle on just before the breads are ready, for the tin.
-
Rest 1 h to 1 h 30 minTemp 24 °C–28 °COfficial text
Leave them to rise for as long as they need, at room temperature or in a proving cabinet.
Check Grown by about half, puffy and soft; a fingertip pressed gently into the side leaves a dent that springs back slowly. The cuts have opened a little.
Tip Our guide: about an hour in a warm room, 24 °C–28 °C, up to 90 minutes in a cooler one: go by the check. Do not let them double, or the pattern blurs.
Tip Our guide: with lievito madre the rise takes several hours, often 3–4; keep the breads covered and go by the same check.
The scissors and the oven
-
Hands-on 5 minOfficial text
Once risen, cut the dough with scissors to make the final form. If you like, sprinkle the shapes with grains of semola as you cut.
Check Rows of small points stand up along the top of each bread, still attached at their base.
Tip Our guide: hold the scissors almost flat to the surface and snip small V shapes about 5 mm deep, in rows or in a ring, so each point lifts like a little horn. Work quickly, so the breads do not stand too long.
Tip Our guide: the specification allows a sprinkling of semola here; a pinch on each bread is enough.
-
Hands-on 2 minTemp 200 °COfficial text
Bake with or without steam. If you like, put a container full of water in the oven: its steam gives the bread a fine shine by the end of baking.
Check The two trays on the two middle shelves, the water hissing in the tin below, the door shut.
Tip Our guide: pour about 200 ml of boiling water into the hot tin as the trays go in, and shut the door at once. Keep your face and hands clear of the steam.
-
Cooking 15 minTemp 200 °C
Bake for 15 minutes at 200 °C, then take out the tin of water, with oven gloves.
Check The breads have set and the points have opened; the crust is pale and beginning to colour.
Tip Our guide: without the steam the crust dries and colours for the rest of the bake. Swap the two trays over now, top to bottom, and turn them round, so both bake evenly.
-
Cooking 25–30 minTemp 200 °C
Bake on at 200 °C until the breads are well golden and fragrant: about 40–45 minutes in all.
Check Golden all over, from ivory to amber, darker on the points; tapped underneath, they sound hollow, and a probe in the thickest part reads 96 °C or more.
Tip Our guide: if the points brown too fast before the base is done, lay a sheet of baking paper loosely over the top for the last minutes.
-
Rest 20 minOfficial text
Coccoi can be eaten still warm, straight from the oven, or kept, with no particular care, for a few days after baking.
Check Broken by hand, the crust is crisp and cracks audibly; the crumb inside is close and fine, soft and velvety.
Tip Our guide: let the breads stand on a wire rack for at least 20 minutes, so the crumb sets and the crust stays crisp; then keep them in a cloth or a paper bag.
The essentials, for cooks who know the dish. Switch to Detailed for quantities, temperatures, times and checks at every step.
Press “I’m here” on the step you are on, and again when it is done.Tap the pin on the step you are on, and the tick when it is done. Timers keep running while you scroll.
Da sapere
Good to know
- WhenQuando
- In the past it was made only for special occasions, such as weddings (coccoi de is sposus) and Easter. Source
- KeepingConservazione
- It can be eaten still warm, straight from the oven, or kept, with no particular care, for a few days after baking. Source
- VariantsVarianti
- With eggs in the shell (coccoi cun s'ou): The Easter version. Six eggs, whole in their shells, are dipped in boiling water for about 5 minutes and left to cool completely, so that the shell holds in the oven. After shaping, an egg is set in the middle of each bread; the breads are decorated with roses, plaits, leaves and cords made from a separate, unleavened dough of 200 g of semola worked smooth and compact with a little water, which keeps its shape in the oven. A bread shaped like a little girl with an egg is a pippia cun s'ou. (The food-safety reference we follow recommends putting cooked perishable food, such as these baked eggs, in the fridge within 2 hours of baking, and eating it within 3 days.) Source
- With almonds or sultanas: Shelled almonds may be set into the surface of the bread, or a few sultanas laid in a hollow inside it and closed over with strips of dough that let the filling show. Like eggs, of hen or quail, they are decorations only, never mixed into the dough. Source
- With a pre-dough (the indirect method): Before the dough is made, part of the semola is mixed with lukewarm water and lievito naturale and left to ripen and rest at room temperature; it is then worked wholly into the dough after the semola, water and salt have been mixed, and again the leaven never touches the salt directly. Source
- A long loaf with folded edges: A piece of dough is rolled into a cylinder and hollowed along its whole length with a rolling pin; the edges are pressed flat, cut with a knife into small notches and folded in towards the middle. Source
Errori comuni
Common mistakes
- Putting the yeast straight onto the salt: mix the semola, water and salt first, and add the dissolved yeast after.
- Using soft wheat flour: the specification allows only durum wheat.
- Making the dough soft: it is a pasta dura, a firm dough, and the cuts need that firmness to keep their shape in the oven.
- Giving the dough a first rise in bulk, as some household recipes do: the specification's phases go straight from rolling to shaping and decorating, and the only rise is after.
- Letting the shaped breads double: the pattern of cuts blurs; bake them when they are about half as big again.
- Using baking powder or bicarbonate: the specification forbids chemical raising agents.
Fuori dall'Italia
Cooking it outside Italy
- Look for semola rimacinata di grano duro, sold in English as re-milled durum wheat semolina: it is fine, like flour, unlike the coarse semolina sold for pasta and puddings.
- Fresh yeast is sold in cubes by bakers and some supermarkets; dried yeast, which the specification also allows, works at about a third of the weight, 7 g for 20 g.
- Once the PGI is granted, only bread made in Sardinia under the specification may be sold as Pane Coccoi; the name is not to be translated. Made anywhere else, this is a home version.
From nonnario.com/recipes/pane-coccoi/, where you will find its sources, its story and the step photos. Sources checked in November 2026.