Genova, Liguria
Torta pasqualina
Genoa's Easter pie of thin oiled sheets around chard, curd cheese and whole eggs
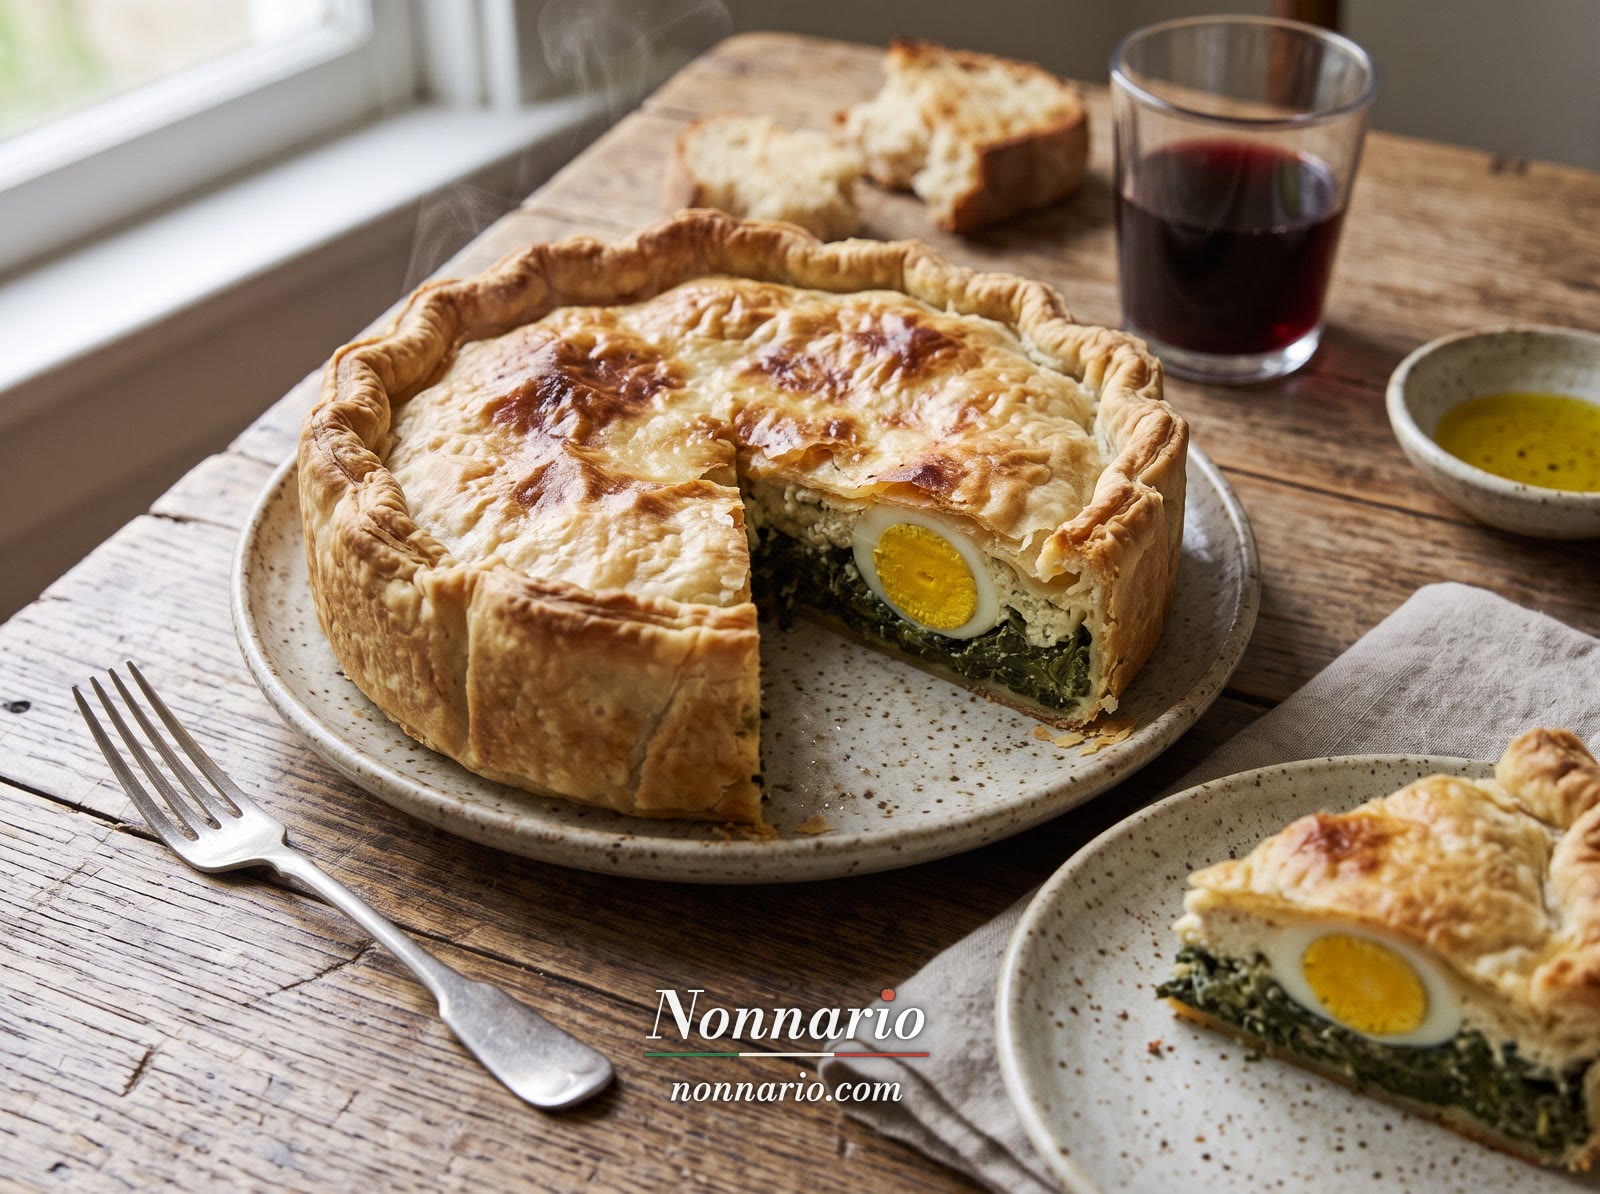
Genoa's Easter pie: 33 sheets of olive-oil pastry, stretched until almost transparent, around a layer of chard with Parmigiano and marjoram, a layer of prescinsêua curd cheese and six whole eggs that set in the oven; on Liguria's list of traditional food products.
- Course
- AntipastiStarters
- Serves
- 8
- Hands-on
- 3 h 29 min
- Cooking
- 55 min
- Resting
- 1 h 41 min+
In breve
In short
Also called torta pasqualinn-a.
- Vegetarian
- Pastry of flour, water, olive oil and salt only, with no yeast, divided into 33 balls: 13 sheets go under the filling and 20 over it.
- Each sheet rolled, then stretched over the fists until almost transparent, and brushed with oil so the layers stay apart.
- Two layers kept separate: chard cooked with onion and garlic, bound with eggs, Parmigiano and marjoram, then prescinsêua.
- Six hollows in the cheese, each with a whole raw egg, lightly salted, that sets firm as the pie bakes.
- Baked at 180 °C–200 °C for about 50 minutes, until golden with a crisp rolled rim.
La provenienza
Where this recipe comes from
Liguria bakes savoury pies from almost every vegetable; in Genoa pride of place goes to the Easter one, the torta pasqualina, which is now known outside the city too. It is named after the feast it was made for, to celebrate the Resurrection. Tradition says that the most skilful cooks of old could lay 33 sheets of pastry in one pie, one for each year of Christ's life. It is said that families without an oven of their own took their pie to the baker and cut their initials into its rim, so they could tell it apart. Ratto's Cuciniera Genovese, in its eighth edition of 1893, calls it a pie very common among the Genoese, eaten in the Easter season, and makes it with 27 sheets, 19 of them under the filling, and ten eggs; it names fresh eggs, fine oil and very thin sheets as what makes a good one. Today it is found in Genoa's restaurants and rotisseries all year round. The torta pasqualina and prescinsêua, the slightly sour fresh curd cheese of the province of Genoa that fills it, are both on Italy's list of traditional food products for Liguria.
There is no official recipe: we found no protected name, no recipe registered by a town and none deposited. We compared four recipes, from 1893 to today, and publish the most widely recognised version. They agree on a pastry of flour, water, oil and salt, rolled into very thin sheets brushed with oil, around chard, a fresh curd cheese or ricotta, Parmigiano and whole eggs set into hollows in the filling; most add marjoram and keep the chard and the cheese in separate layers. They differ on the number of sheets, from 33 to as few as five, on raw or hard-boiled eggs, on butter, and on onion and garlic. This page keeps the 33 sheets and the raw eggs, which set in the oven. Ours are the servings, the size of the tin and of the sheets, the amount of water, the oven setting inside the published range, and the food safety: the pie is baked until a probe reads 71 °C in the middle of the filling and in the yolk of one egg, with the yolk set, is in the fridge within 2 hours of baking, is out of the fridge for no more than 2 hours when served, and is eaten within 3 days of cooking the chard, so a pie made the day before keeps two more days.
- Provenance
- A regional tradition documented in cookbooks and local practice, with no single official text.
- Defined by
- Genoese tradition
- Reference
- Compared across 8 sources, listed below; this page publishes the most widely recognised version.
- Sources
- Visit Genoa, the City of Genoa's tourism site: torta pasqualina, from the guide ‘Genova a Tavola’ (Italian)
- Visit Genoa, the City of Genoa's tourism site: prescinsêua (Italian)
- Accademia Italiana della Cucina: torta pasqualina, a Ligurian recipe from its collection, for 8 (Italian)
- Dissapore, an Italian online food magazine: torta pasqualina, 2021 (Italian)
- Giovanni Battista and Giovanni Ratto, La Cuciniera Genovese: the Genoese cookbook, eighth edition, Genoa, 1893 (Italian, Internet Archive)
- Ministry of Agriculture (MASAF): the 25th revision of the national list of traditional agri-food products, 2025, with ‘Torta pasqualina’ and ‘Prescinseua’ for Liguria (Italian)
- USDA Food Safety and Inspection Service: Leftovers and Food Safety
- USDA Food Safety and Inspection Service: Shell Eggs from Farm to Table
Ingredienti
Ingredients
Makes one torta pasqualina in a round tin 26 cm across, for 8: 8 servings
For the pastry
For the chard layer
For the prescinsêua layer
To fill and finish
Equipment
- Large wooden board and a long, thin rolling pin
- Kitchen scale
- Two clean cotton cloths, one of them damp
- Fine sieve and a clean, thin cloth, to drain the prescinsêua
- Large pot or wide pan with a lid, a colander and a large tray
- Frying pan about 28 cm across
- Two mixing bowls
- Round tin 26 cm across and about 4 cm deep
- Pastry brush and a small bowl of oil
- A drinking straw
- Kitchen scissors
- Probe thermometer
- Wire rack
Preparazione
Method
About 5 to 6 hours, most of it hands-on, on the day of baking or the day before serving. Start by draining the prescinsêua in the fridge. Make the dough and let the 33 balls rest while you cook the chard and mix the two layers, which then wait in the fridge. Rolling and stretching the 33 sheets is the long part, about 2 hours (longer the first time): 13 for the base, then the filling and the eggs, then 20 for the top, with the oven heating as you begin them. About 50 minutes in the oven. Serve it warm after about 20 minutes, or have it in the fridge within 2 hours of baking and serve it cold the next day. The filling and the eggs are out of the fridge no more than 2 hours before the pie goes in the oven.
- 3 h 29 minhands-on
- 55 mincooking
- 1 h 41 minresting, at least
The curd and the dough
-
Hands-on 3 min
Line the sieve with the thin cloth, set it over a bowl and tip in the 400 g of prescinsêua. Put it in the fridge to drain while you make the dough and the chard.
Check The whey begins to drip into the bowl.
Tip Our guide: about an hour. The cheese must be well drained, or its whey soaks the sheets; some cooks squeeze it in the cloth, others leave it for hours under a weight.
Tip It stays in the fridge: it is a fresh cheese.
-
Hands-on 5 min
Heap the 500 g of flour on the board and make a well in the middle. Pour in the 2 tablespoons of oil, add the 2 pinches of salt and start working in the lukewarm water, a little at a time, drawing in the flour from the inside.
Check It gathers into one soft ball with no dry flour left. Stop adding water once it is soft; you may not need it all.
Tip Our guide: about 270 ml of water. The recipe asks only for as much as makes a soft, smooth dough.
-
Hands-on 10 min
Knead well, pushing the dough away with the heel of your hand, folding it back and turning it.
Check Soft, smooth and elastic, not sticky; a dent pressed into it springs back slowly.
Tip Our guide: about 10 minutes. A soft dough is what lets the sheets stretch thin without tearing.
-
Hands-on 10 min
Divide the dough into 33 equal pieces and roll each into a smooth ball. Set them on the floured board, dust them with flour and cover them with the damp cloth.
Check 33 balls of the same size, none touching, all under the cloth.
Tip Our guide: weigh the dough and divide by 33; each ball is about 24 g. Make 13 a few grams larger if you like: the base sheets have to climb the sides of the tin.
-
Rest 30 min to 1 h
Leave the balls to rest under the damp cloth while you cook the chard and mix both layers.
Check A ball pressed with a finger is soft and relaxed and the dent stays; the surface has not dried.
Tip Our guide: at least 30 minutes. Rested dough stretches without springing back. If the cloth dries, dampen it again.
The chard layer
-
Hands-on 15 min
Trim the base of the 1 kg of young chard and any thick, tough stalks, then wash the leaves in plenty of cold water, changing it until no grit is left. Lift them out without drying them.
Check The leaves are clean, with no soil at the bottom of the bowl, and still wet.
Tip Some cooks keep only the leaves and discard every stalk and thick rib.
-
Cooking 5–8 minHeat medium
Put the wet leaves in the large pot with a splash of water, cover and cook, turning them once or twice, until they collapse and are tender.
Check The leaves are dark, soft and limp, and the thickest stalk is tender when pinched.
Tip Our guide: 5–8 minutes, with only the water left on the leaves and a few spoonfuls more, so they do not take up water.
-
Hands-on 10 min
Tip the chard into the colander and let it cool until you can handle it. Squeeze it hard, a handful at a time, then chop it finely.
Check Squeezed again in your fist, it gives only a few drops.
Tip A wet filling makes the base soggy: squeeze it as hard as you can.
-
Hands-on 5 minHeat medium-low
Warm the 2 tablespoons of oil in the frying pan and cook the chopped onion and garlic, stirring, until soft and pale gold.
Check The onion is translucent and soft, just colouring at the edges; the garlic has not browned.
Tip Our guide: about 5 minutes. Burnt garlic turns bitter: lower the heat if it starts to darken.
-
Hands-on 10 minHeat medium
Add the chopped chard and cook it for 10 minutes, stirring often.
Check No liquid runs into the pan when you push the chard aside; it smells sweet, not raw.
Tip Season lightly with salt here, if you like, and taste again once the cheese is in.
-
Rest 20 min
Spread the chard on the tray and let it cool.
Check Cool to the touch, no warmer than your hand.
Tip Our guide: the eggs go in next, and warm chard would start to set them; it also goes onto raw sheets, which warmth would soften.
-
Hands-on 5 min
Put the chard in a large bowl and mix in the 2 eggs, the 80 g of grated Parmigiano Reggiano and the chopped marjoram. Taste for salt and pepper. Cover and put it in the fridge.
Check Evenly green and bound, with no streaks of egg; it holds together on a spoon.
Tip It contains raw eggs: keep it in the fridge until you spread it.
The prescinsêua layer
-
Hands-on 5 min
Discard the whey. Mix the drained prescinsêua with the 2 tablespoons of flour, the 2 tablespoons of oil and the 20 g of grated Parmigiano, then season it with salt and pepper. Cover and put it back in the fridge.
Check Smooth and thick enough to spread, with no lumps of flour and no whey pooling around it.
Tip If it is still runny, drain it a little longer before adding the flour.
The base: 13 sheets
-
Hands-on 2 min
Brush the base and sides of the tin with oil. Set out the bowl of oil and the brush beside the board.
Check An even film of oil on the base and up the sides, with no dry patches.
Tip Our guide: a round tin 26 cm across and about 4 cm deep.
-
Hands-on 2 min
Take one ball from under the cloth and roll it with the rolling pin on the lightly floured board, as thin as you can.
Check A round sheet that you can already see the board through.
Tip Our guide: keep the other balls covered all the time, or they dry out and crack.
-
Hands-on 2 min
Oil your hands, close them into fists, almost clenched, and lift the sheet onto the backs of your hands. Move your fists gently apart, turning the sheet as you go, to stretch it thinner still, until it is almost transparent.
Check You can read through it, and it is about 38 cm across, wide enough to cover the base and sides of the tin and hang over the rim.
Tip Our guide: about 38 cm for the base sheets. Work from the middle outwards and keep the edges a little thicker for the rim.
Tip A sheet must not tear. Our guide: if one does, patch it by laying the torn part over sound pastry; if it tears badly, ball it up and roll it again after a rest.
-
Hands-on 1 min
Lay the sheet in the tin, easing it into the corner and up the sides, with the rest hanging over the rim. Brush it all over with oil.
Check The base and sides are covered with no folds trapped in the corner, and the whole sheet glistens.
Tip The oil keeps the sheets apart in the oven, so that they bake into separate flaky layers.
-
Hands-on 40–50 min
Roll and stretch 12 more balls in the same way, laying each over the last and brushing it with oil, but do not oil the thirteenth, the last of the base.
Check 13 sheets in the tin, all oiled but the top one, which is dry to the touch.
Tip Our guide: about 3–4 minutes a sheet once you have the knack.
The filling and the eggs
-
Hands-on 3 min
Spread the chard mixture evenly over the last, unoiled sheet.
Check One even layer, right to the sides.
Tip The chard and the cheese stay in two separate layers: mixing them makes a different pie.
-
Hands-on 3 min
Spread the prescinsêua mixture over the chard with the back of a spoon.
Check No chard shows through the white layer.
-
Hands-on 2 min
With a spoon, make 6 hollows, evenly spaced, in the filling.
Check Six hollows deep enough to hold an egg each without it running over, with filling still covering the bottom.
Tip Our guide: five in a ring and one in the middle, or six in a ring, so that each slice can have an egg.
-
Hands-on 3 min
Take the 6 eggs out of the fridge. Break one into each hollow and season each with a small pinch of salt.
Check Six whole eggs, yolks unbroken, each in its own hollow.
Tip Our guide: break each egg into a cup first, then slide it into its hollow, so a broken yolk or a bit of shell does not end up in the pie.
Tip Some cooks add a little oil, grated Parmigiano and pepper to each egg; others use hard-boiled eggs, shelled.
The top: 20 sheets
-
Hands-on 1 minTemp 190 °CHeat top and bottom heat, no fan
Heat the oven to 190 °C, with a shelf just below the middle.
Check By the time the top is finished, an oven thermometer reads 190 °C.
Tip Our guide: 190 °C, the middle of the 180 °C–200 °C the recipe allows, turned on now so it is hot when the pie is ready.
-
Hands-on 4 min
Roll and stretch a ball as before, lay it over the filling and the eggs without pressing, and brush it with oil.
Check The filling is covered with the edges over the rim, and the eggs are still whole beneath it.
Tip Our guide: the top sheets need only be about 32 cm across.
Tip Lay it loosely: pulled tight, it can break the yolks.
-
Hands-on 1 h to 1 h 15 min
Roll, stretch and lay the other 19 balls in the same way, so that every sheet is oiled on both sides: it lies on the oil of the one below and is brushed in turn. Every few sheets, lift an edge, slip the straw between the sheet you have just laid and the one beneath, and blow gently to keep them apart.
Check 20 sheets over the filling, each glistening with oil; the top puffs a little when you blow.
Tip Our guide: keep your eye on the clock. The filling and the eggs should not be out of the fridge more than 2 hours before the pie goes in the oven, and the top takes about an hour.
Tip Our guide: if the top will not be finished within about 1 hour 45 minutes of spreading the chard, cover the tin with a cloth and put it in the fridge, keeping the balls under their damp cloth. From then on keep the tin in the fridge and take it out only to lay each sheet: the time out of the fridge adds up, chilling does not restart it, and in all it stays under 2 hours. Finish the top and bake it the same day; a chilled pie may need longer in the oven, and the probe still decides.
-
Hands-on 5 min
Press the overhanging edges of the top and base sheets together so they stick well, then roll them inwards all round to form a thick rim along the edge of the tin.
Check A sealed, even rope of pastry all the way round, with no gap where the filling shows.
Tip Our guide: if the overhang is longer than about 3 cm, trim it with scissors first, or the rim will be too heavy to crisp.
-
Hands-on 1 min
Brush the top and the rim with oil.
Check The whole surface glistens.
Tip Some cooks prick the top a few times, so that it does not burst in the oven.
Baking
-
Cooking 50 minTemp 190 °CHeat top and bottom heat, shelf just below the middle
Bake the pie for about 50 minutes, until it is golden and the rim is crisp.
Check An even golden top and a crisp, deeper golden rim that sounds hollow when tapped.
Tip If the top colours too fast, lay a loose sheet of foil over it for the rest of the time.
-
Hands-on 2 minTemp 71 °C
Push the probe through the top into the middle of the filling, then through the top into the yolk of one egg (the middle one, if you made one).
Check At least 71 °C in the middle of the filling and in the yolk, and the yolk feels set, not liquid, under the tip of the probe.
Tip Our guide: 71 °C is the temperature the food-safety guidance we follow gives for dishes with eggs, and it asks for eggs cooked until both white and yolk are firm. The eggs are hidden under 20 sheets, so the probe is the only way to know: check rather than trust the colour.
Tip Below 71 °C: cover the top loosely with foil and bake 10 minutes more, then check again.
Tip The probe hole also lets steam out.
Cooling, keeping and serving
-
Rest 20 min to 1 h 30 min
Set the tin on the wire rack. To serve it warm, leave it about 20 minutes, then cut it in the tin. To serve it cold, leave it to cool, then turn it out.
Check Warm: the filling has settled and no longer steams hard when cut. Cold: the base of the tin is barely warm, and the pie slides out in one piece.
Tip Turn it out only once it has cooled: hot, it can break.
Tip It is good cold, some say better. Our guide: to serve it warm, cut it after about 20 minutes.
-
Rest 1 min
Wrap the pie, or what is left of it, and put it in the fridge within 2 hours of taking it out of the oven. Eat it within 3 days of cooking the chard.
Check In the fridge, wrapped, less than 2 hours after it came out of the oven.
Tip Our guide: the 3 days count from the day you cooked the chard, the first part of the pie to be cooked, not from the baking. Made the day before serving, it keeps two more days after that.
Tip Never leave it out overnight: with eggs and fresh cheese, it is a dish for the fridge.
-
Rest 30 min
Take the pie out of the fridge about 30 minutes before serving and cut it into 8 slices, each with an egg if you can. Put what is left back in the fridge no more than 2 hours after you took it out.
Check The chill has gone from the slices; what is left is back in the fridge within the 2 hours.
Tip Our guide: the 2 hours count from when it left the fridge, not from when it is served. After that it goes back in the fridge or is thrown away, and it never comes out again for a further 2 hours.
Tip To eat it warm the next day, reheat slices in the oven until at least 75 °C at the centre.
The essentials, for cooks who know the dish. Switch to Detailed for quantities, temperatures, times and checks at every step.
Press “I’m here” on the step you are on, and again when it is done.Tap the pin on the step you are on, and the tick when it is done. Timers keep running while you scroll.
Da sapere
Good to know
- WhenQuando
- Made for Easter, to celebrate the Resurrection; today Genoa's restaurants and rotisseries sell it all year round. Source
- KeepingConservazione
- In the fridge within 2 hours of baking, wrapped, and eaten within 3 days of cooking the chard; served from the fridge, it is out for no more than 2 hours. Source
- VariantsVarianti
- Torta cappuccina: The same ingredients, but the greens, the curd and the eggs are mixed together instead of being kept in separate layers. Source
- With artichokes: Artichokes in thin slices, fried in oil with chopped onion, in place of the chard, with ricotta instead of prescinsêua. Source
- With cream in the curd: For 8, 1 kg of flour made into 16 to 24 sheets, about a dozen under the filling; the drained curd, or ricotta, is thinned with two glasses of cream, and 8 to 12 eggs go into the hollows, each with oil, Parmigiano and white pepper. Source
- With hard-boiled eggs: Five sheets only, around chard mixed with ricotta, Parmigiano and an egg, with three or four shelled hard-boiled eggs set in the filling; baked at 180 °C for about 45 minutes. Source
Errori comuni
Common mistakes
- Thick sheets: roll and then stretch each one until it is almost transparent, or the pie is heavy and the layers do not flake.
- Forgetting the oil between sheets: unoiled sheets bake into one stiff crust.
- A wet filling: squeeze the chard hard and drain the prescinsêua well, or the base turns soggy.
- Mixing the chard, the cheese and the eggs together: that is the torta cappuccina, not the pasqualina.
- Letting the balls dry under a dry cloth: keep it damp, or the sheets crack as you stretch them.
- Leaving the filling and the eggs out while you roll: they are out of the fridge no more than 2 hours before the pie goes in the oven; if you are slow, chill the tin between sheets, counting the time out in total.
- Taking it out of the oven by colour alone: the filling and the yolk of one egg must both reach 71 °C on the probe, with the yolk set.
- Keeping it at room temperature for the next day: it goes into the fridge within 2 hours of baking.
Fuori dall'Italia
Cooking it outside Italy
- Prescinsêua, the fresh, slightly sour curd cheese of Genoa, is hard to find outside the province: use the same weight of ricotta, drained in a cloth like the curd. It lacks the curd's slight sourness, so taste the seasoning.
- Bietoline are young, tender chard; erbette are a small-leaved cutting chard sold in bunches, also called perpetual spinach. Swiss chard does well with its thick stalks trimmed off; spinach can stand in.
- Plain flour (UK) or all-purpose flour (US) works for the pastry.
From nonnario.com/recipes/torta-pasqualina/, where you will find its sources, its story and the step photos. Sources checked in November 2026.